OPEN NAT Guide
February 06, 2024
Overview
This guide will walk you through the steps necessary to get an OPEN nat on gaming systems using UPnP and BiNAT.
Requirements
You will need at a MINIMUM 2 Public IP addresses. In the environment used here, we have 3 public IP addresses.
Step 1.
Create the Network address or addresses for the Public IP addresses. Here we have 2 blocks because the ISP has not given us a contiguous block. Note that if the block was contiguous we could create a single Network address record with the span set to 3 instead of the two addresses we need to create here.
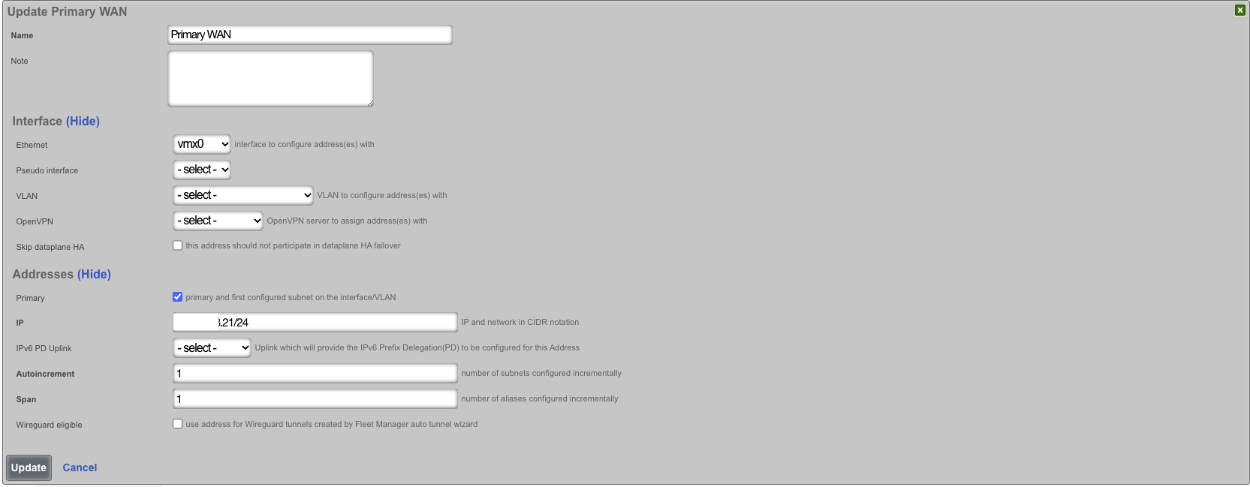
First Network address contains the IP address that will be assigned to the rXg (this is the rXg's IP address and the FQDN resolves to this IP address. This IP cannot be used as a BiNAT address). The Primary box is checked here which indicates that this is the rXg's IP address on this network.
 001.png 59.78 KB
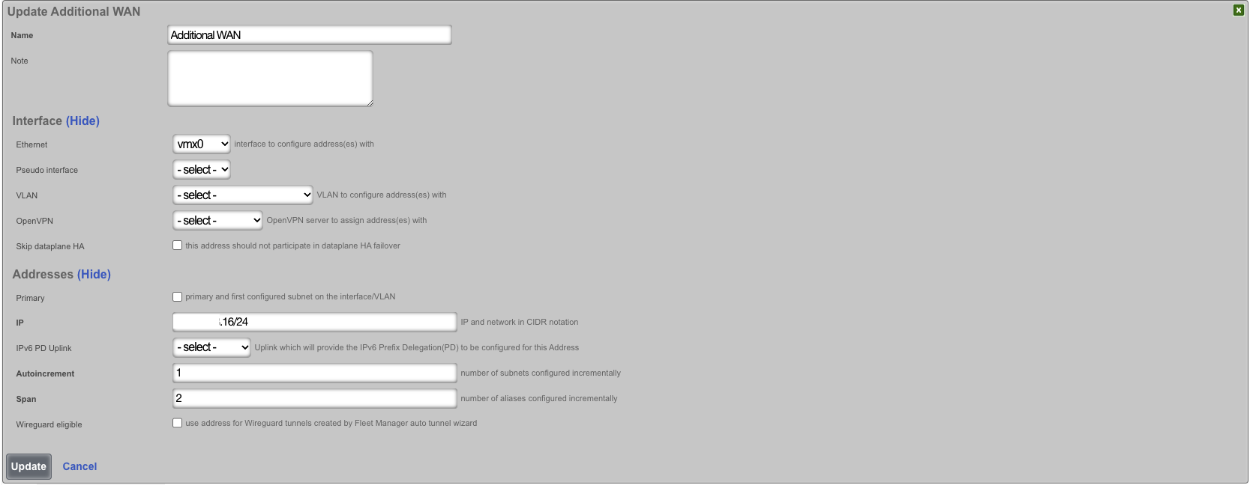
For this example we need to create a 2nd Network address that includes our additional WAN addresses that we can use for BiNAT. Here we can leave the Primary checkbox unchecked. Here we have the Span set to 2 because we want to include the .16 address as well as the .17 address.
 002.png 60.1 KB
Step 2.
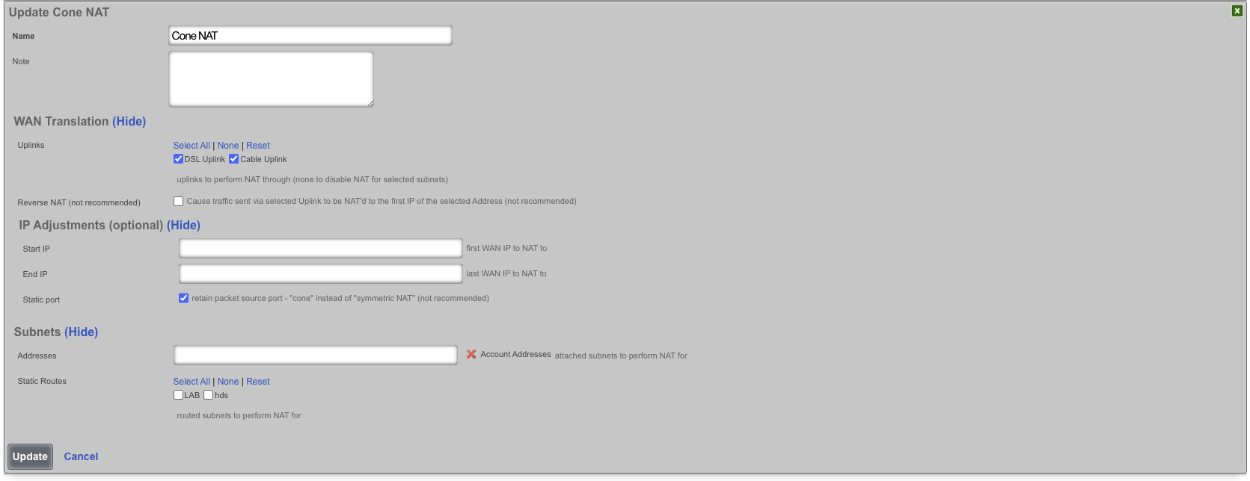
Next we need to enable "Cone" nat, or Static NAT, to do this navigate to Network::NAT and edit the NATs rule that was auto-created. Check the "Static port" box and click update, this will make it so that the source ports remain the same and do not change. This is required for UPnP to work correctly.
 003.png 52.74 KB
Step 3.
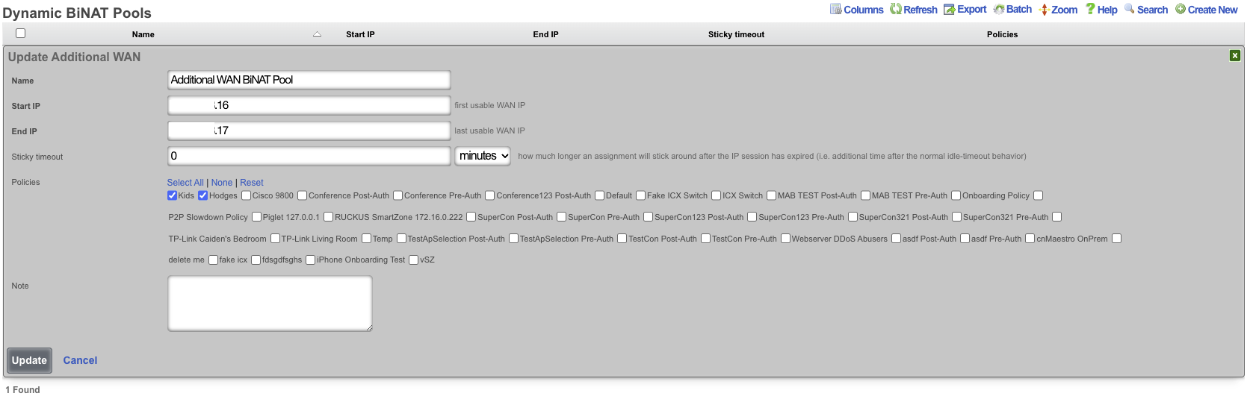
Now that we have some additional IP addresses we need to add them to a BiNAT pool so we can assign them to accounts that have purchased a public IP address. Requirements for the plans will be shown in a later step. Navigate to Network::NAT and create a new
Dynamic BiNAT Pool. Here we must give the record a name and then define the addresses we will use for BiNAT. On this system we have 3 Public IP addresses. The .21 address is the rXg's IP address and as such we must exclude this from the pool. We will start this pool at .16 and
the ending IP address will be the .17 address. Without creating this record ALL 3 IP addresses would be used for CG NAT, by defining this BiNAT Pool record we are removing the .16 and .17 addresses from the CG NAT pool. Next we must select which Policy or Policies are allowed to draw from
the pool. Here we have two policies selected, only devices that are in a policy selected in this record can draw from the pool.
 004.png 83.24 KB
Step 4.
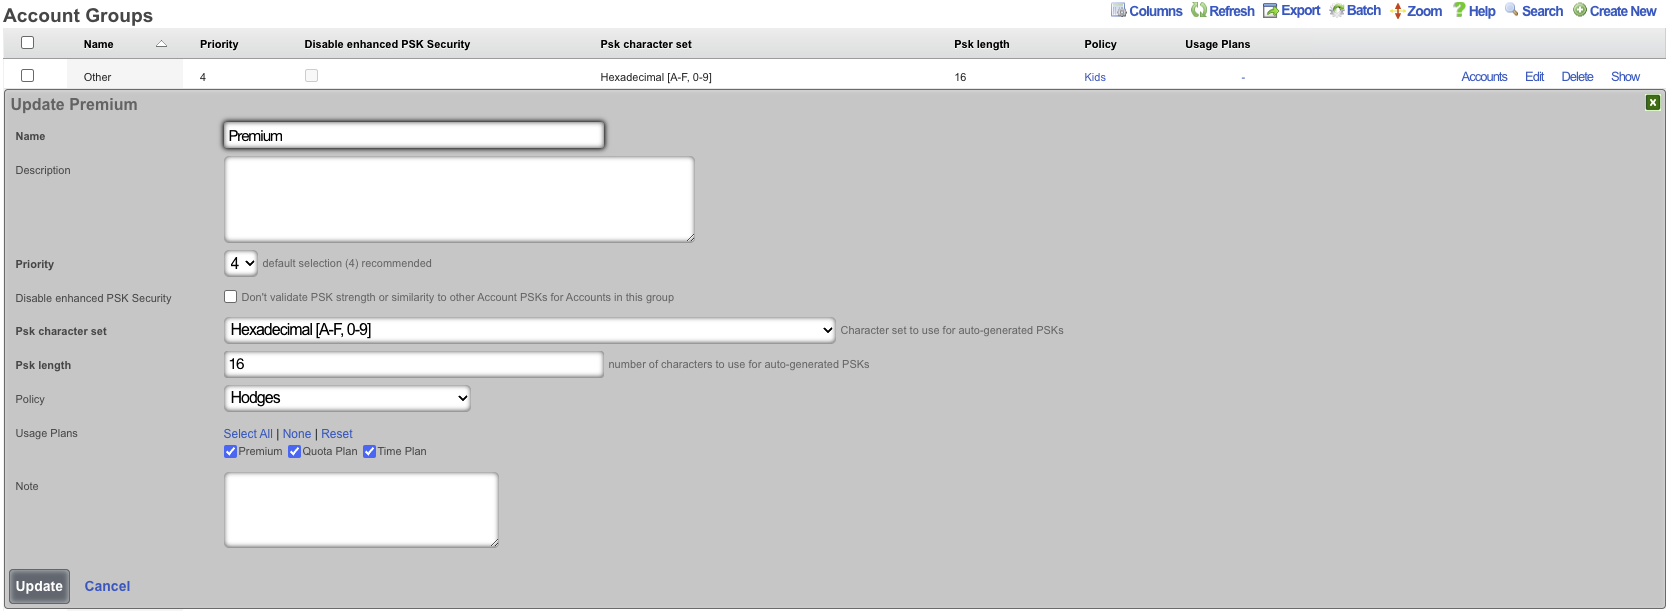
At least one Usage Plan will need to be created that allows for at least 1 dedicated IP (BiNAT) address to be assigned to the account. Navigate to Billing::Plans and create a new Usage Plan or edit an existing plan. The Usage plan must be tied to an Account Group, that is in a policy we selected in the previous step. The Premium Account Group selected here, ties into at least one of the policies selected here.
 005.png 58.17 KB
Here is the association between the Account Group and Policy.
005.png 58.17 KB
Here is the association between the Account Group and Policy.
 006.png 96.56 KB
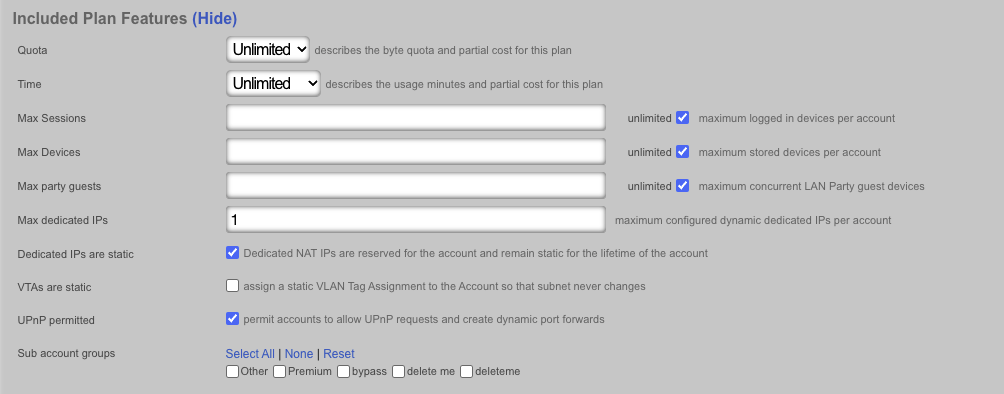
In the Usage Plan we need to make sure that the max Dedicated IP address field is set to 1 or higher. This determines how many pubic IP addresses the account can consume. Here we are only allowing for an account to have a single public IP address so the value will be set to 1. After editing the
Usage Plan we will want to find the "Included Plan Features", here we need to focus on 3 fields. The "Max dedicated IP's" field; this field is where we set the max number of public IP address that can be assigned to an account that has purchased this plan, for this we will set this number to 1. The next field we need to pay attention to is the "Dedicated IP's are static" field; this field is optional, if checked the account will always get the same public IP address, basically checking this box makes the public IP address static, and leaving it unchecked means that the public IP address that assigned could potentially change. The last field we need to look at is the "UPnP permitted" field; this should be checked by default, verify it is checked, this will allow devices in the account to request ports be forwarded to the device using UPnP. Turning this off will likely not allow for an OPEN nat without manual port forwards being created. *Note: UPnP will work without creating a BiNAT pool as long there is more than 1 public IP address assigned to the system, you can still potentially get a strict NAT under these conditions because some game system like the Xbox for example will only use 5 ports to achieve the open NAT so if you have >5 Xbox's on the network behind a single IP address you will run out of ports.
006.png 96.56 KB
In the Usage Plan we need to make sure that the max Dedicated IP address field is set to 1 or higher. This determines how many pubic IP addresses the account can consume. Here we are only allowing for an account to have a single public IP address so the value will be set to 1. After editing the
Usage Plan we will want to find the "Included Plan Features", here we need to focus on 3 fields. The "Max dedicated IP's" field; this field is where we set the max number of public IP address that can be assigned to an account that has purchased this plan, for this we will set this number to 1. The next field we need to pay attention to is the "Dedicated IP's are static" field; this field is optional, if checked the account will always get the same public IP address, basically checking this box makes the public IP address static, and leaving it unchecked means that the public IP address that assigned could potentially change. The last field we need to look at is the "UPnP permitted" field; this should be checked by default, verify it is checked, this will allow devices in the account to request ports be forwarded to the device using UPnP. Turning this off will likely not allow for an OPEN nat without manual port forwards being created. *Note: UPnP will work without creating a BiNAT pool as long there is more than 1 public IP address assigned to the system, you can still potentially get a strict NAT under these conditions because some game system like the Xbox for example will only use 5 ports to achieve the open NAT so if you have >5 Xbox's on the network behind a single IP address you will run out of ports.
 007.png 62.39 KB
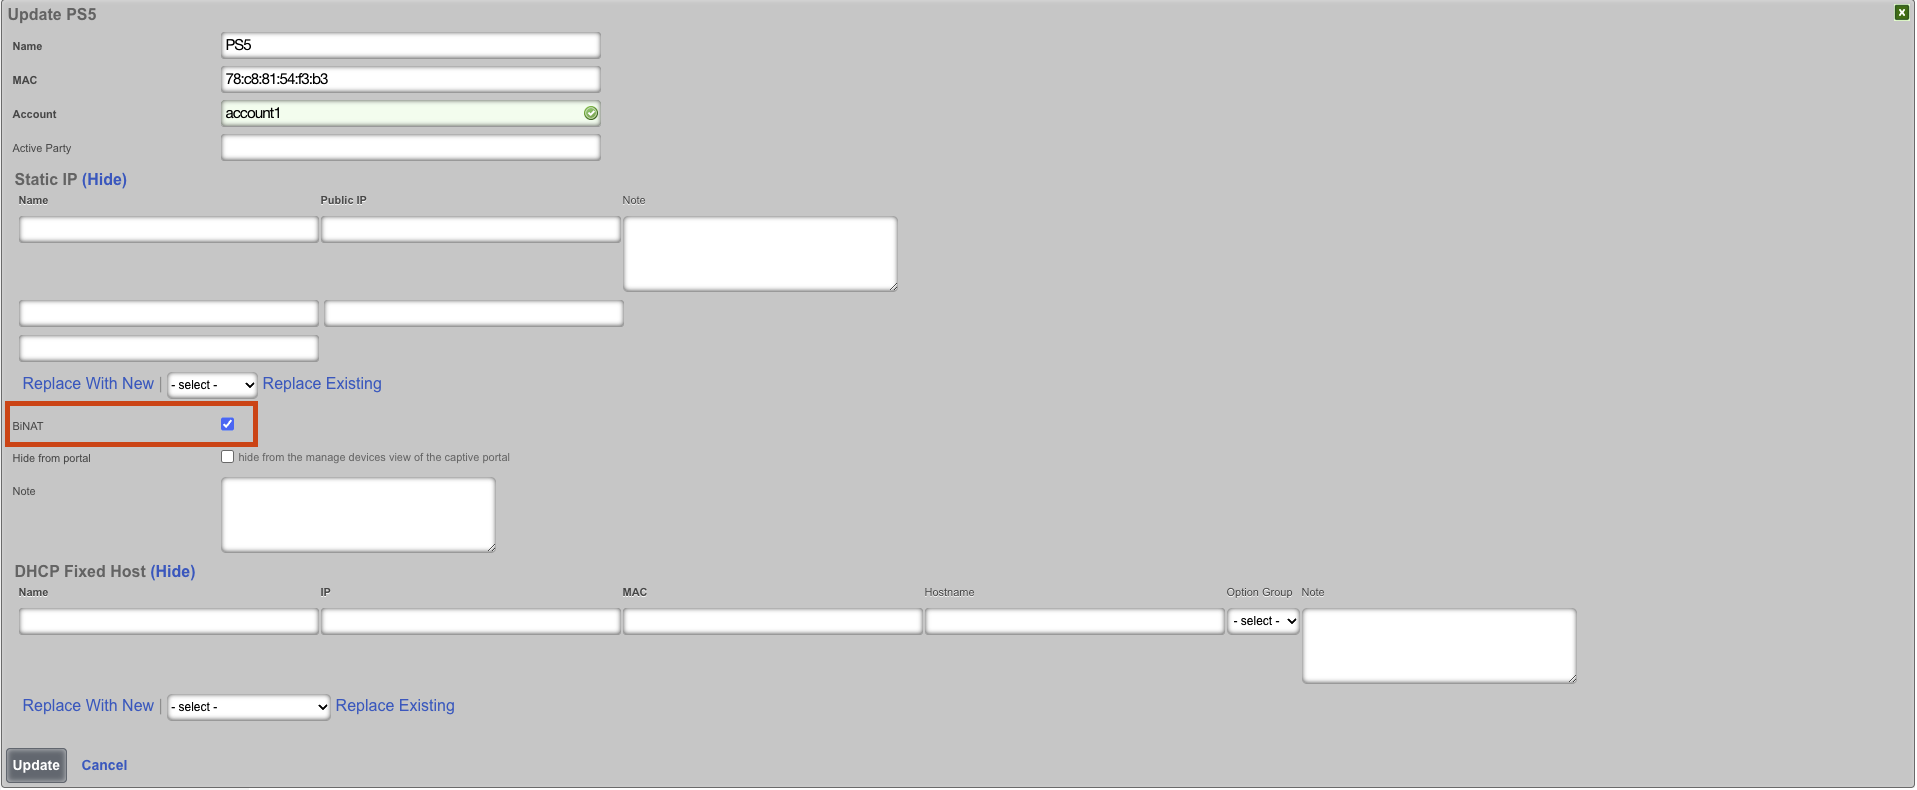
When an account has a Dedicated IP >=1 it is also possible to assign a device the BiNAT address and it will forward everything to the device (DMZ), this should not be required to achieve OPEN NAT. To do this via the Admin gui navigate to Identities::Accounts and search for the device in the Device Scaffold. Edit the Device and check the BiNAT box. Again I want to stress that this is not required to achieve OPEN NAT on a game console.
 Screen Shot 2024-02-02 at 11.35.05 AM.png 86.48 KB
This can also be achieved via the Landing portal. Open up a browser on a device behind the rXg and navigate to https://wi.fi (default configuration, this may be different for you) this will load the landing page, click on Devices on the left menu. Find the device you wish to assign the BiNAT (DMZ) to and enable the toggle.
 Screen Shot 2024-02-02 at 11.40.42 AM.png 158.44 KB
Conclusion
By configuring the above we now have a plan that allows for a public IP address, and a pool of public IP addresses to draw from. While this example only shows a small pool, setting up for a larger pool is as easy as expanding the BiNAT pool as long as the Network address record has been updated to reflect the additional IP addresses.


