rXg with dynamic WAN addressing
January 31, 2025
Introduction
The rXg platform is typically deployed with a static public IP address assigned to it, providing a fixed mapping between its public FQDN and the public IP address.
However, in a number of cases a static public IP address is simply not provided by the local ISP, and the rXg platform has to be deployed with an FQDN that maps into a dynamically assigned IP address. The frequency of changes of the public IP address is ISP-dependent and is hard to predict, really. The manual mapping with the public DNS service provider is painstaking and will lead to frequent outages for any associated services running across the rXg platform.
A dynamic update client provided by most of the DNS service providers comes into play in such scenarios, automatically updating the DNS-to-public-IP mapping records whenever a change on the ISP side is detected. This KB document shows how to deploy a dynamic update client (DUC) using the virtualization capabilities inherent to the rXg platform, tie it back to the FQDN, enabling a stable deployment of the rXg-enabled network with dynamic public IP address. The No-IP DNS provider is used in this KB document as an example, though the general methodology applies equally to all major DNS providers alike.
The rXg platform used in this KB document is on code release 16.025, providing added functionality in the ‘Services::Virtualization’ scaffold when compared to the previous stable release 15.812.
Create a VM within rXg
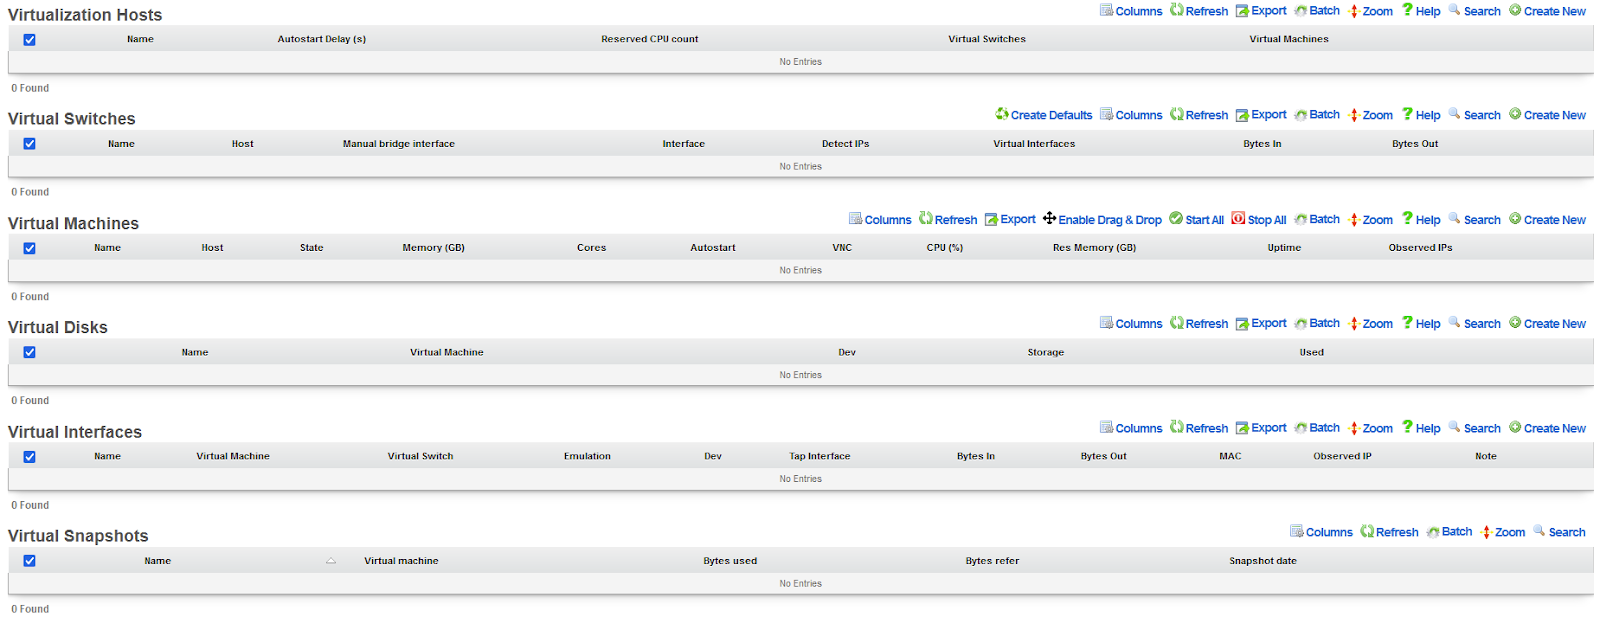
The default state of the ‘Services::Virtualization’ scaffold is shown below.
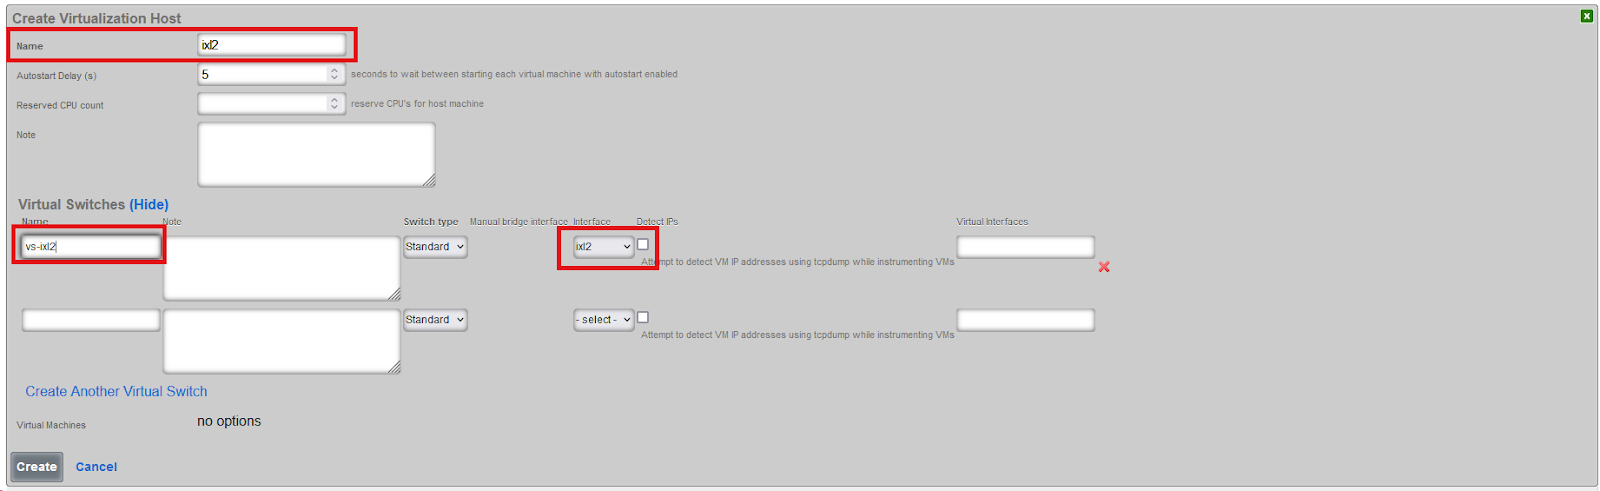
To start with, create a new virtualization host in the ‘Services::Virtualization::Virtualization Hosts’ scaffold, as shown below. One of the physical 10GE interfaces (ixl2) is used in this case.
Delete all entries under ‘Virtual Switches’ apart from the entry for ‘ixl2’ interface, as shown below. Create an arbitrary name for the virtualization host (‘ixl2’ as shown below) and the virtual switch (‘vs-ixl2’ as shown below). Make sure that the ‘Detect IPs’ option is checked to be able to track individual IP addresses traversing the given virtual switch. While functionally not required, it is recommended for added visibility and simpler troubleshooting.
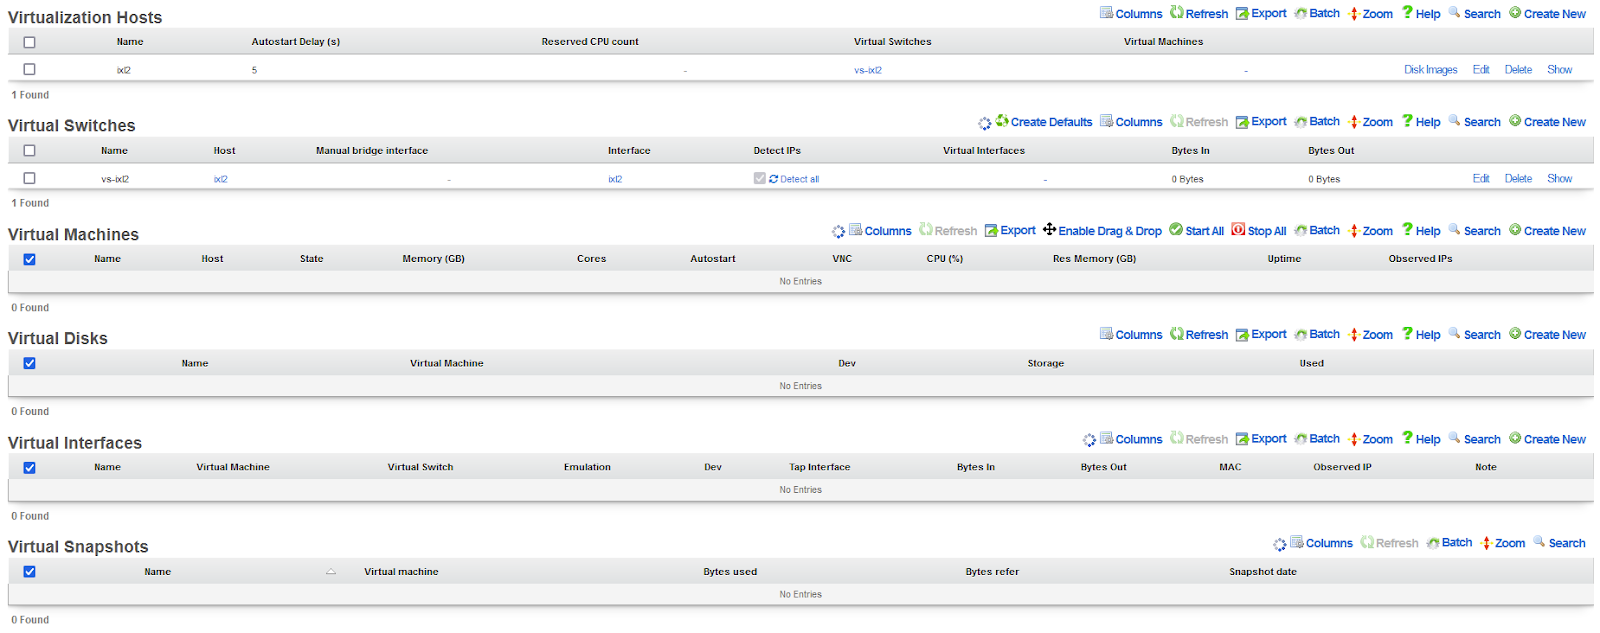
Once the virtualization host and the associated virtual switch is created, the configuration scaffold looks as follows, showing entries under ‘Virtualization Hosts’ and ‘Virtual Switches’.
Next, add a virtual machine disk. The simplest way to add a disk is to deploy a cloud image for Ubuntu 24.04, which can be easily located online using your preferred search engine (look for ‘noble-server-cloudimg-amd64.img’). There is also a very handy shortcut in ‘Virtualization Hosts’ scaffold. Click on ‘Disk Images’ link and a new scaffold opens for ‘Disk Images for ixl2’. Then select ‘Create New’ option and then select ‘Current Ubuntu 24.04 LTS (Noble Numbat)’ option to populate the download URL.
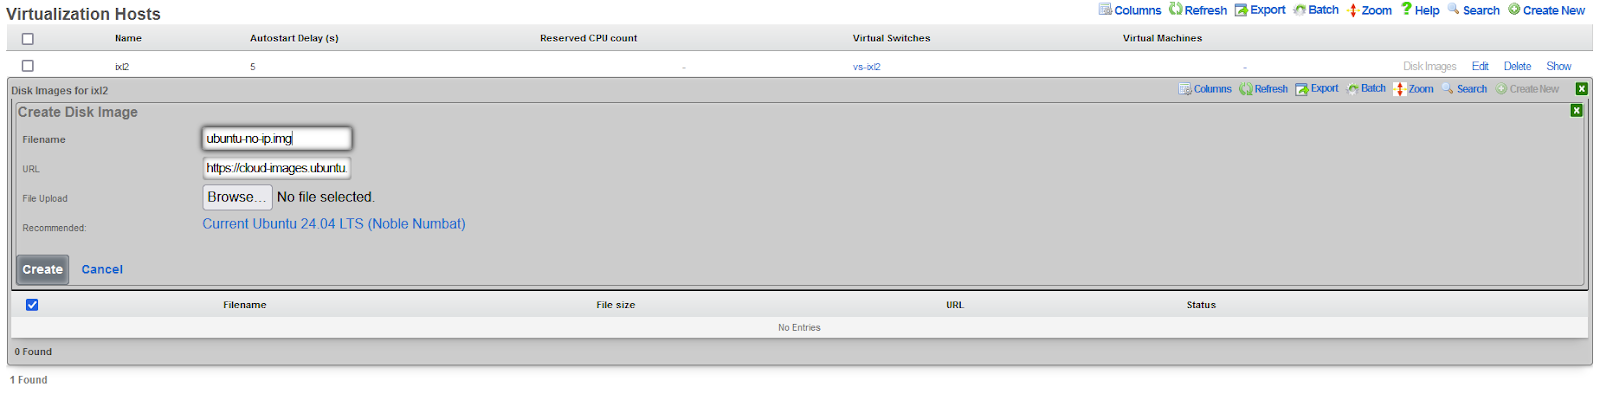
Select the ‘Create’ option and wait for the image to be downloaded to the local rXg storage. The disk image status will change from ‘Pending’

to ‘Exists’ when the download is done and the local file has been properly saved.

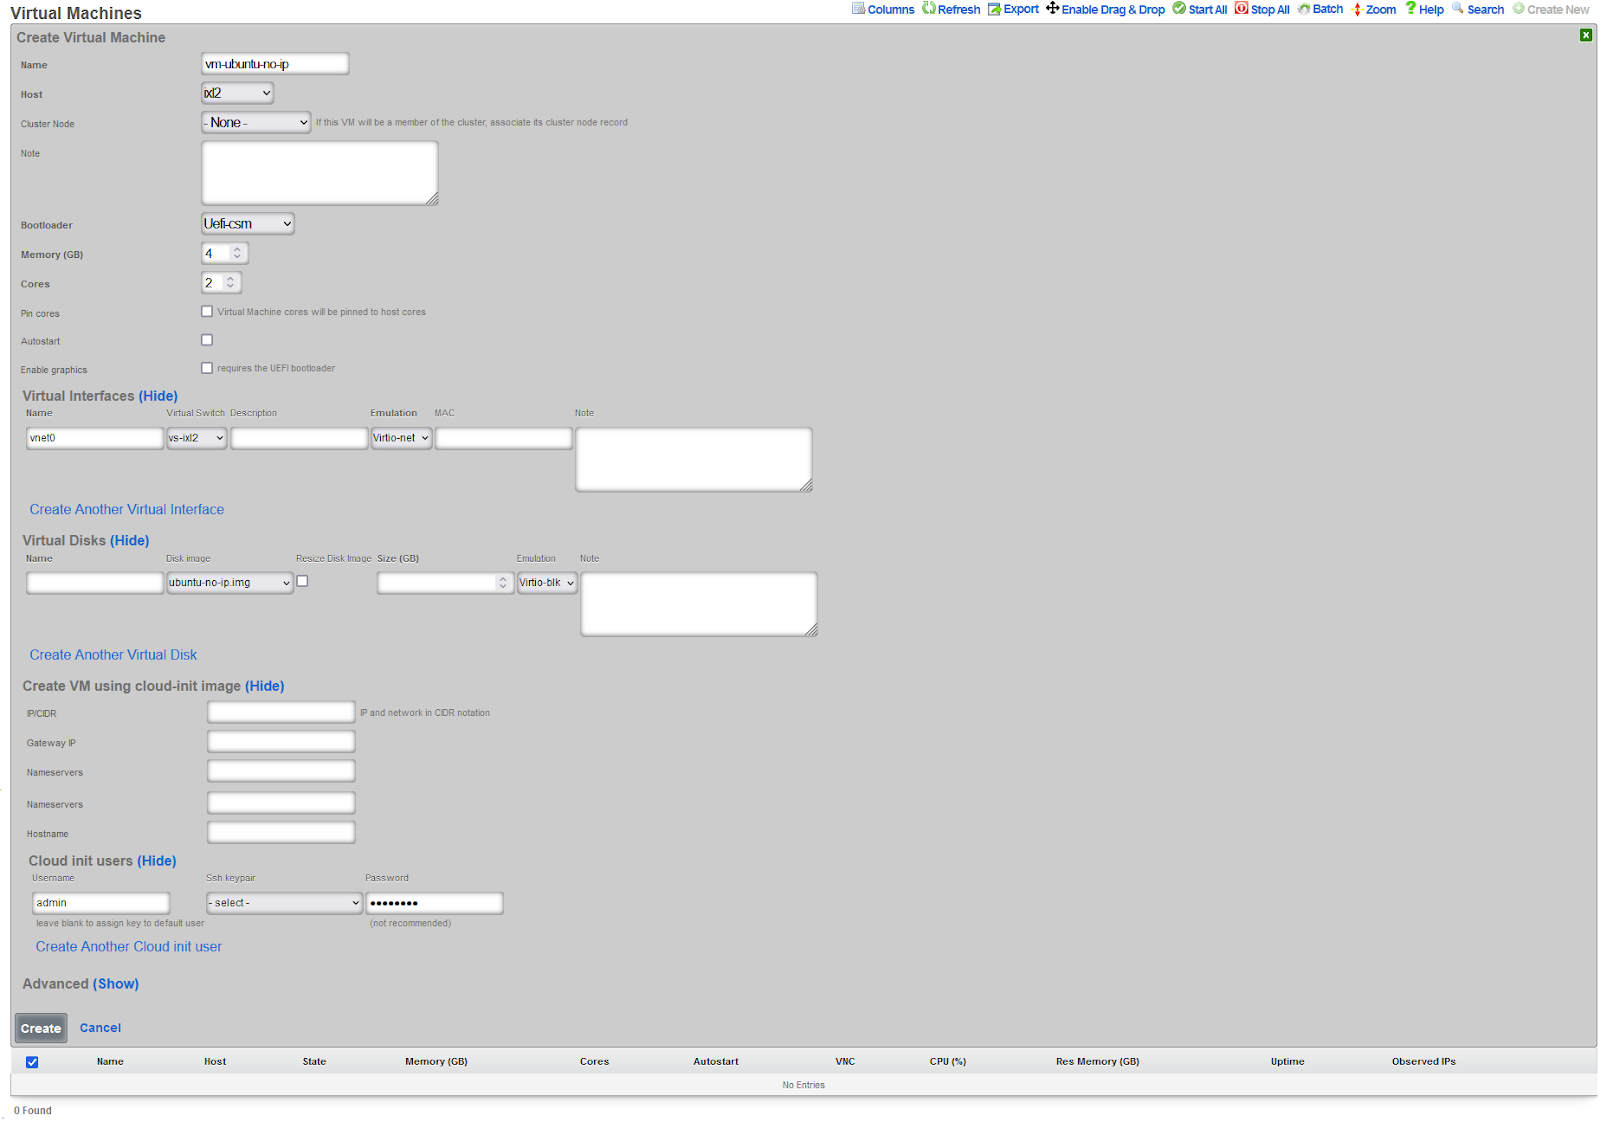
Afterwards, it is time to create a virtual machine under the ‘Virtual Machines’ scaffold, as shown below. The following fields need to be filled in or modified:
- ‘Name’, with an arbitrary name for this virtual machine
- ‘Host’, make sure that ‘ixl2’ virtualization host is selected
- ‘Bootloader’, make sure that the ‘uefi-csm’ is selected for any Ubuntu image
- ‘Memory’ and ‘Cores’ should be assigned whatever values are recommended for the given image. In the case of Ubuntu 24.04 server image, 4 GB of memory and 2 CPU cores are sufficient, especially when only basic functionality is running.
- ‘Autostart’, check the box to autostart the VM. It can be also selected later on, when the VM is created and installed.
- Select the previously created virtual switch ‘vs-ixl2’, leave the ‘Emulation’ type as ‘Virtio-net’ (default setting), and assign a name to the interface (e.g., ‘vnet0’).
- Select the previously created disk image to be used (‘ubuntu-no-ip.img’), leave the name, size and emulation with their default values.
- Fill in the username and password / SSH keypair in the cloud init users. Multiple users can be created simultaneously.
- The IP address settings are left empty - VM address will be assigned using DHCP server
Once created, the VM status shows ‘Creating’

until the process is done and the VM status changes to ‘Stopped’

Once the virtual machine is created, the configuration scaffold looks as follows, showing new entries under ‘Virtual Machines’, ‘Virtual Disks’, and ‘Virtual Interfaces’.
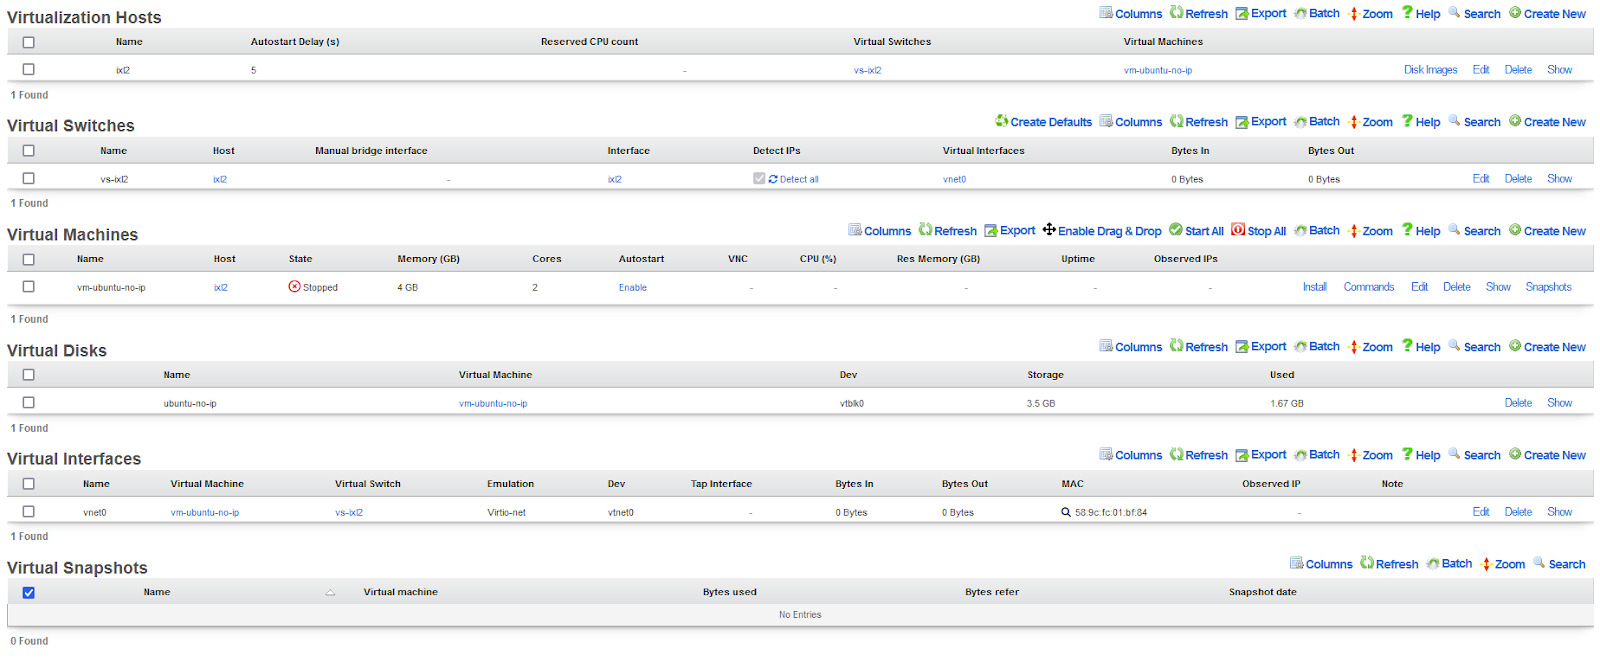
The network interface MAC address is ‘58:9c:fc:01:bf:84’ and can be used to populate a fixed IP address in the DHCP server within the rXg platform using the ‘Services::DHCP::DHCP Fixed Hosts’ scaffold, as shown below:

Back in the ‘Services::Virtualization::Virtual Machines’ scaffold, hover over the ‘Commands’ menu and select the ‘Start’ option. The VM state changes into ‘Running’, as shown below

There is no UI console enabled by default to keep the VM resources low, and the access to the VM requires access to the rXg shell. To access the VM console, drop into the rXg shell, list the VM instances
rxg# vm list
NAME            DATASTORE  LOADER   CPU  MEMORY  VNC  AUTO  STATE
vm_ubuntu_no_ip  default    uefi-csm  2 4G      -   No  Running (20202)
And then connect to the console on the VM
rxg# vm console vm_ubuntu_no_ip
Connected

ubuntu login: admin
Password:
Welcome to Ubuntu 24.04.1 LTS (GNU/Linux 6.8.0-51-generic x86_64)

 * Documentation:  https://help.ubuntu.com
 * Management:  https://landscape.canonical.com
 * Support:     https://ubuntu.com/pro

 System information as of Tue Jan 28 18:33:27 UTC 2025

  System load:  0.21            Processes:              193
  Usage of /:   67.0% of 2.35GB   Users logged in:      0
  Memory usage: 5%              IPv4 address for enp0s6: 10.0.30.2
  Swap usage:   0%


Expanded Security Maintenance for Applications is not enabled.

0 updates can be applied immediately.

Enable ESM Apps to receive additional future security updates.
See https://ubuntu.com/esm or run: sudo pro status

Failed to connect to https://changelogs.ubuntu.com/meta-release-lts. Check your Internet connection or proxy settings
$ ip a
1: lo: <LOOPBACK,UP,LOWER_UP> mtu 65536 qdisc noqueue state UNKNOWN group default qlen 1000
    link/loopback 00:00:00:00:00:00 brd 00:00:00:00:00:00
    inet 127.0.0.1/8 scope host lo
    valid_lft forever preferred_lft forever
    inet6 ::1/128 scope host noprefixroute
    valid_lft forever preferred_lft forever
2: enp0s6: <BROADCAST,MULTICAST,UP,LOWER_UP> mtu 1500 qdisc fq_codel state UP group default qlen 1000
    link/ether 58:9c:fc:01:bf:84 brd ff:ff:ff:ff:ff:ff
    inet 10.0.30.2/24 metric 100 brd 10.0.30.255 scope global dynamic enp0s6
    valid_lft 3076sec preferred_lft 3076sec
    inet6 fe80::5a9c:fcff:fe01:bf84/64 scope link
    valid_lft forever preferred_lft forever
The IP address assigned to the VM can be verified using the ‘Services::Virtualization::Virtual Interfaces’ scaffold, as shown below

Install DUC
Once the VM is up and running and shell access is available, it is possible to SSH remotely into the VM from the rXg shell, eliminating the need for console connectivity.
rxg# ssh [email protected]
The authenticity of host '10.0.30.2 (10.0.30.2)' can't be established.
ED25519 key fingerprint is SHA256:Zt2ogOqKn52Vir31FNEcFlDBlbdTioycnH5nCJ0E6wc.
This key is not known by any other names.
Are you sure you want to continue connecting (yes/no/[fingerprint])? yes
Warning: Permanently added '10.0.30.2' (ED25519) to the list of known hosts.
[email protected]'s password:
Welcome to Ubuntu 24.04.1 LTS (GNU/Linux 6.8.0-51-generic x86_64)

 * Documentation:  https://help.ubuntu.com
 * Management:  https://landscape.canonical.com
 * Support:     https://ubuntu.com/pro

 System information as of Tue Jan 28 18:51:00 UTC 2025

  System load:  0.76            Processes:              195
  Usage of /:   67.4% of 2.35GB   Users logged in:      0
  Memory usage: 5%              IPv4 address for enp0s6: 10.0.30.2
  Swap usage:   0%


Expanded Security Maintenance for Applications is not enabled.

0 updates can be applied immediately.

Enable ESM Apps to receive additional future security updates.
See https://ubuntu.com/esm or run: sudo pro status

Failed to connect to https://changelogs.ubuntu.com/meta-release-lts. Check your Internet connection or proxy settings
Download the Linux DUC:
$wget --content-disposition https://www.noip.com/download/linux/latest
--2025-01-28 18:53:11--  https://www.noip.com/download/linux/latest
Resolving www.noip.com (www.noip.com)... 158.247.7.200
Connecting to www.noip.com (www.noip.com)|158.247.7.200|:443... connected.
HTTP request sent, awaiting response... 301 Moved Permanently
Location: https://dmej8g5cpdyqd.cloudfront.net/downloads/noip-duc_3.3.0.tar.gz [following]
--2025-01-28 18:53:11--  https://dmej8g5cpdyqd.cloudfront.net/downloads/noip-duc_3.3.0.tar.gz
Resolving dmej8g5cpdyqd.cloudfront.net (dmej8g5cpdyqd.cloudfront.net)... 18.238.180.188, 18.238.180.174, 18.238.180.33, ...
Connecting to dmej8g5cpdyqd.cloudfront.net (dmej8g5cpdyqd.cloudfront.net)|18.238.180.188|:443... connected.
HTTP request sent, awaiting response... 200 OK
Length: 4896895 (4.7M) [application/x-gzip]
Saving to: ‘noip-duc_3.3.0.tar.gz’

noip-duc_3.3.0.tar.gz                       100%[==============================================================================================>]   4.67M  16.2MB/s in 0.3s

2025-01-28 18:53:11 (16.2 MB/s) - ‘noip-duc_3.3.0.tar.gz’ saved [4896895/4896895]
Extract the file:
tar xf noip-duc_*.tar.gz
Now install it.
$ ls -lah
total 4.8M
drwxr-x--- 5 rxg  rxg  4.0K Jan 28 18:53 .
drwxr-xr-x 3 root root 4.0K Jan 28 18:13 ..
-rw------- 1 rxg  rxg   277 Jan 28 18:47 .bash_history
-rw-r--r-- 1 rxg  rxg   220 Mar 31  2024 .bash_logout
-rw-r--r-- 1 rxg  rxg  3.7K Mar 31  2024 .bashrc
drwx------ 2 rxg  rxg  4.0K Jan 28 18:14 .cache
-rw-r--r-- 1 rxg  rxg   807 Mar 31  2024 .profile
drwx------ 2 rxg  rxg  4.0K Jan 28 18:14 .ssh
drwxrwxr-x 6 rxg  rxg  4.0K Jan 28 18:53 noip-duc_3.3.0
-rw-rw-r-- 1 rxg  rxg  4.7M Sep 17 22:22 noip-duc_3.3.0.tar.gz
cd /home/$USER/noip-duc_3.3.0/binaries && sudo apt install ./noip-duc_3.3.0_amd64.deb
Reading package lists... Done
Building dependency tree... Done
Reading state information... Done
Note, selecting 'noip-duc' instead of './noip-duc_3.3.0_amd64.deb'
The following NEW packages will be installed:
  noip-duc
0 upgraded, 1 newly installed, 0 to remove and 0 not upgraded.
Need to get 0 B/1290 kB of archives.
After this operation, 3293 kB of additional disk space will be used.
Get:1 /home/admin/noip-duc_3.3.0/binaries/noip-duc_3.3.0_amd64.deb noip-duc amd64 3.3.0 [1290 kB]
Selecting previously unselected package noip-duc.
(Reading database ... 74736 files and directories currently installed.)
Preparing to unpack .../noip-duc_3.3.0_amd64.deb ...
Unpacking noip-duc (3.3.0) ...
Setting up noip-duc (3.3.0) ...
noip-duc.service is a disabled or a static unit, not starting it.
Scanning processes...
Scanning linux images...

Running kernel seems to be up-to-date.

No services need to be restarted.

No containers need to be restarted.

No user sessions are running outdated binaries.

No VM guests are running outdated hypervisor (qemu) binaries on this host.
N: Download is performed unsandboxed as root as file '/home/admin/noip-duc_3.3.0/binaries/noip-duc_3.3.0_amd64.deb' couldn't be accessed by user '_apt'. - pkgAcquire::Run (13: Permission denied)
Now it is possible to run DUC using the following syntax
noip-duc -g <FQDN> -u <username> -p <password>
where represents the DNS entry with the No-IP DNS service provider, and and are the account credentials.
Manual DUC execution is painstaking, but it is possible to run the service at the VM startup, copy the service definition file over to the systemd directory:
cp /home/$USER/noip-duc_3.3.0/debian/service /etc/systemd/system/noip-duc.service
Create and edit the file /etc/default/noip-duc using your preferred text editor.
## File: /etc/default/noip-ducNOIP_USERNAME=NOIP_PASSWORD=NOIP_HOSTNAMES=
Example Config File:
NOIP_USERNAME=6zv5hr7
NOIP_PASSWORD=jqAQkF7FGxJJ
NOIP_HOSTNAMES=rxg-temp.myddns.me
Save the file. Next, reload the systemd daemon
sudo systemctl daemon-reload
Then enable the service
sudo systemctl enable noip-ducCreated symlink /etc/systemd/system/multi-user.target.wants/noip-duc.service → /etc/systemd/system/noip-duc.service.
Finally, start the DUC
sudo systemctl start noip-duc
If everything was configured properly, the DUC should be running in the background. You can run the command sudo systemctl status noip-duc and review the recent entries. A successful installation and setup will look like this:
● noip-duc.service - No-IP Dynamic Update Client Loaded: loaded (/etc/systemd/system/noip-duc.service; enabled; preset: enabled) Active: active (running) since Tue 2025-01-28 19:24:57 UTC; 5s ago Main PID: 1491 (noip-duc) Tasks: 1 (limit: 4626) Memory: 388.0K (peak: 848.0K) CPU: 4ms CGroup: /system.slice/noip-duc.service └─1491 /usr/bin/noip-ducJan 28 19:24:57 ubuntu systemd[1]: Started noip-duc.service - No-IP Dynamic Update Client.Jan 28 19:24:57 ubuntu noip-duc[1491]: [2025-01-28T19:24:57Z INFO noip_duc::public_ip] Attempting to get IP with method Dns(No-IP Anycast DNS Tools)Jan 28 19:24:57 ubuntu noip-duc[1491]: [2025-01-28T19:24:57Z INFO noip_duc::observer] got new ip; current=71.218.189.xxx, previous=0.0.0.0Jan 28 19:24:57 ubuntu noip-duc[1491]: [2025-01-28T19:24:57Z INFO noip_duc::observer] update successful; current=71.218.189.xxx, previous=0.0.0.0Jan 28 19:24:57 ubuntu noip-duc[1491]: [2025-01-28T19:24:57Z INFO noip_duc::observer] checking ip again in 5m
Verify Accessibility
The DUC operation can be verified at the No-IP service account, displaying the current hostname records. In this case, a temporary DNS entry ‘rxg-temp.myddns.me’ was created and properly synchronized to the current public address.

The rXg management interface is now exposed on a public Internet via FQDN tied to a dynamic IP address. Additionally services may be exposed using the HTTP(S) proxy or port forwarding, as covered in separate KB documents.


