rXg with OpenWiFi controller
July 03, 2025
Introduction
As a data connectivity technology, Wi-Fi is the critical underpinning of our modern digital lives, connecting billions of devices globally, from smartphones and laptops to smart home gadgets and industrial IoT sensors. However, the way Wi-Fi networks are deployed and managed has largely remained unchanged for the past two decades. Traditional Wi-Fi deployments involve costly proprietary equipment, relatively cumbersome configurations, and often limited flexibility in managing configuration, especially at scale, requiring the deployment of proprietary controllers with vendor-specific configuration.
Enter OpenWiFi, an open-source platform (seehttps://github.com/Telecominfraproject/wlan-ap), which promises to revolutionize the deployment and management of Wi-Fi networks by providing a more cost-effective, flexible, and scalable solution that stands to change the landscape of wireless network infrastructure. Developed by the OpenWiFi Project under the leadership of the Telecom Infra Project (TIP), OpenWiFi is expected to change the Wi-Fi deployment landscape, building on the OpenRAN (https://telecominfraproject.com/openran/) and OpenLAN (https://telecominfraproject.com/openlan/) experience.
The RG Nets rXg is a sophisticated multi-services edge gateway providing a plethora of network functions, from routing to secure NAC to virtual broadband gateways and so many services in-between, including Wi-Fi management, virtualization, and network element management.

As such, it is well suited for on-premise deployment of a OpenWiFi controller at a variety of scales, including a small residential experiment. The OpenWiFi controller can be hosted natively using a local rXg instance, following this KB.
The rXg test platform used in this KB document is on code 16.047, providing added functionality in the ‘Services::Virtualization’ scaffold and additional OpenWiFi Controller integrations, when compared to the previous stable release 15.812. It is recommended to check for the latest stable build of the rXg software frequently to take advantage of this ever evolving platform.
The OpenWiFi Controller deployment process includes several steps, covered in individual sections below. Once the OpenWiFi Controller is fully deployed, OpenWiFi WAPs may be discovered and configured within the rXg, using the native integration provided by the rXg platform, without the need to log into the standard OpenWiFi UI.
Create a Certificate Authority
The OpenWiFi Controller requires a local certificate authority to work correctly, and luckily the rXg platform is capable of providing one, without installing any additional software. Note that the local certificate authority does not require a public SSL/TLS certificate issued by a trusted CA, and may be configured without the rXg system having one.
Using the ‘System::Certificates::Certificate Authorities’ scaffold, a new local certificate authority can be created via the ‘Create New’ button:

The life span of the local certificate authority can be changed to something very long, for example 10 years (3650 days) as used in the example above. Once created the scaffold shows the active certificate authority configuration, as shown below:

Create a Virtualization Host
The Virtualization Host in the rXg system is a representation of the ‘bhyve’ hypervisor/virtual machine manager for FreeBSD that supports a wide range of guest operating systems. bhyve supports multiple storage and networking back-ends, UEFI, FreeBSD loader, and GRUB booting, PCI Pass-Through (PPT), integrated VNC and 9pfs servers, and many more features. Details can be found at the respective Wiki page (https://wiki.freebsd.org/bhyve).
The rXg system provides a UI management for ‘bhyve’ within the ‘Services::Virtualization’ scaffold, providing access to the hypervisor, virtual switches, and individual virtual machines, once created.
The default state of the ‘Services::Virtualization’ scaffold is shown below.

To start with, create a new virtualization host in the ‘Services::Virtualization::Virtualization Hosts’ scaffold, as shown below. One of the physical 1GE interfaces (igb1) is used in this case.
Delete all entries under ‘Virtual Switches’ apart from the entry for ‘igb1’ interface, as shown below. Create an arbitrary name for the virtualization host (‘rgxdev02’ as shown below) and the virtual switch (‘rxgdev02-vs’ as shown below). Names of the virtualization host and virtual switch are arbitrary, and may be left with their default values.
Make sure that the ‘Detect IPs’ option is checked to be able to track individual IP addresses traversing the given virtual switch. While functionally not required, it is recommended for added visibility and simpler troubleshooting.

Once the virtualization host and the associated virtual switch is created, the configuration scaffold looks as follows, showing entries under ‘Virtualization Hosts’ and ‘Virtual Switches’, with respective previously configured elements.

Download OpenWiFi Controller Image
The OpenWiFi Controller image can be downloaded directly from the ‘System::Backup::Config Templates’ scaffold, using one of the pre-deployed templates: ‘Example: 06 Download Rxg Openwifi Image Config’. There are no changes to this template, so it is sufficient to simply click the ‘Apply’ button associated with this template example, as shown below:

Confirm the download process via the pop-up window

and the template is executed successfully, as shown below.

The download progress can be observed in the ‘Services::Virtualization::Virtualization Hosts’ scaffold, by clicking on the ‘Disk Images’ for the previously created virtualization host (rgxdev02, created previously) in the example below.

The download process may take some time, depending on your Internet connection speed, target RGNets server load, etc. Once the download is complete, the disk image status changes as follows. The OpenWiFi disk image at the time of writing is around 2.8GB in size and it is expected to grow over time, as more functionality is being added to this system.

The disk image is now ready to be deployed using the configuration template covered in the following section of this document.
Deploy OpenWiFi Controller
In the ‘System::Backup::Config Templates’ scaffold, locate Example 7 and click the ‘Edit’ button to customize the template, as outlined below.

The ‘config’ section of the template contains a YAML script, which describes all the hardware and configuration parameters.
<%
name ||= "openwifi"
memory_gb ||= 8
ncpu ||= 8
disk_size_gb ||= 40
bootloader ||= 'uefi'
disk_image_id ||= DiskImage.find_by(filename: 'rxg-openwifi.img')&.id || 1

# Virtual interface configuration. The listed switches will be mapped to virtual
# interfaces named vtnet0, vtnet1, etc.
mapped_switches = ["igb0", "igb1", "igb2"]

# Cloud-init config
# Specify the CIDR, gateway, and nameservers for the cloud-init configuration.
cidr ||= '192.168.5.5/24'
gateway ||= '192.168.5.1'
nameservers ||= '192.168.5.1'

# Hostname  should be hardcoded
hostname = 'openwifi.wlan.local'
# To connect via ssh you must specify your ssh_keypair name
ssh_keypair ||= ''
ssh_user = 'openwifi-admin'
ssh_pass = 'P@ssw0rd123'

%>

- virtual_machines:
  - name: <%= name %>
    virtualization_host: {_lookup: first}
    memory_gb: <%= memory_gb %>
    ncpu: <%= ncpu %>
    bootloader: <%= bootloader %>
    enable_graphics: true
    cidr: <%= cidr %>
    gateway: <%= gateway %>
    nameservers: <%= nameservers %>
    hostname: <%= hostname %>
    disk_image_id: <%= disk_image_id %>
    resize: true
    enable_graphics: false
    cloud_init_users:
    - ssh_keypair: <%= ssh_keypair %>      password: <%= ssh_pass %>
    - username: <%= ssh_user %>
      ssh_keypair: <%= ssh_keypair %>
      password: <%= ssh_pass %>
    virtual_disks:
    - name: <%= name %>
      size_gb: <%= disk_size_gb %>
    virtual_interfaces:
    <% mapped_switches.each_with_index do |switch, index| %>
    - name: vtnet<%= index %>
      virtual_switch: <%= switch %>
    <% end %>

- dns_records:
  - name: <%= hostname %>
    data_type: A
    host: <%= hostname %>
    data: <%= cidr.split('/')[0] %>
    ttl: 3600
The majority of defaults are acceptable, but a few items need to be modified to match the local virtualization environment settings, as follows:
- Map the virtual network interfaces for the controller (mapped_switches parameter) to the physical interface associated with the virtual switch. In this example, the ‘rxgdev02-vs” is associated with ‘igb1’ physical interface.
- The choice of the virtual switch and the mapped physical interface dictates the IP address assignment. In the case of the test system used for the KB, interface igb1 has the 10.0.49.1/24 address assigned to it, with the DHCP pool covering .2 through .254 in this subnet. A static IPv4 address of 10.0.49.2 will be used for the OpenWiFi Controller, with the gateway / DNS located at 10.0.49.1.
- The SSH username / password remain the same (unchanged from default, obviously not advisable for production systems) and the ssh_keypair is filled in with the name of the SSH public key from the ‘System::Admins::Administrator’ scaffold, the ‘SSH Keypairs’ column. A single entry is sufficient in this case, with the example using the ‘RSA 4096 20241217’ value. Spaces in the SSH keypair names are permitted.
Also, since the rXg system used for this KB is small scale, the number of ncpu (virtual CPUs applied to the controller) was decreased from 8 (default) to 2. The resulting YAML configuration file for the OpenWiFi controller after all the changes is as follows:
<%
name ||= "openwifi"
memory_gb ||= 8
ncpu ||= 2
disk_size_gb ||= 40
bootloader ||= 'uefi'
disk_image_id ||= DiskImage.find_by(filename: 'rxg-openwifi.img')&.id || 1

# Virtual interface configuration. The listed switches will be mapped to virtual
# interfaces named vtnet0, vtnet1, etc.
mapped_switches = ["rxgdev02-vs"]

# Cloud-init config
# Specify the CIDR, gateway, and nameservers for the cloud-init configuration.
cidr ||= '10.0.49.2/24'
gateway ||= '10.0.49.1'
nameservers ||= '10.0.49.1'

# Hostname should be hardcoded
hostname = 'openwifi.wlan.local'
# To connect via ssh you must specify your ssh_keypair name
ssh_keypair ||= 'RSA 4096 20241217'
ssh_user = 'openwifi-admin'
ssh_pass = 'P@ssw0rd123'

%>

- virtual_machines:
  - name: <%= name %>
    virtualization_host: {_lookup: first}
    memory_gb: <%= memory_gb %>
    ncpu: <%= ncpu %>
    bootloader: <%= bootloader %>
    enable_graphics: true
    cidr: <%= cidr %>
    gateway: <%= gateway %>
    nameservers: <%= nameservers %>
    hostname: <%= hostname %>
    disk_image_id: <%= disk_image_id %>
    resize: true
    enable_graphics: false
    cloud_init_users:
    - ssh_keypair: <%= ssh_keypair %>      password: <%= ssh_pass %>
    - username: <%= ssh_user %>
      ssh_keypair: <%= ssh_keypair %>
      password: <%= ssh_pass %>
    virtual_disks:
    - name: <%= name %>
      size_gb: <%= disk_size_gb %>
    virtual_interfaces:
    <% mapped_switches.each_with_index do |switch, index| %>
    - name: vtnet<%= index %>
      virtual_switch: <%= switch %>
    <% end %>

- dns_records:
  - name: <%= hostname %>
    data_type: A
    host: <%= hostname %>
    data: <%= cidr.split('/')[0] %>
    ttl: 3600
Once the configuration code has been customized, save the template and click the ‘Apply’ button to kick start the deployment process. A confirmation dialog is displayed, as follows

and going to the ‘Services::Virtualization::Virtual Machine’ scaffold, a new VM instance can be seen, as follows. The ‘Creating’ state indicates that the OpenWiFi Controller is being created with the prescribed set of parameters, per previously modified YAML file.

The creation process may take a while, depending on the storage type, disk size, and the system utilization. Use the ‘Refresh’ button in the scaffold to status of the process.
Additional new elements are also displayed in the ‘Services::Virtualization::Virtual Disks’ and ‘Services::Virtualization::Virtual Interfaces’ scaffolds, associated with the new VM instance. Note that the ‘Services::Virtualization::Virtual Switches’ also shows a tie back of a vtnet0 virtual interface for the OpenWiFi controller back to the ‘rxgdev02-vs’ virtual switch.
Once the OpenWiFi Controller VM is successfully created, it will be in a stopped state. This is a normal condition for a newly created virtual machine.

Enable the auto start using the ‘Enable’ button on the ‘Autostart’ column in the ‘Services::Virtualization::Virtual Machines’ scaffolds, and then use the ‘Start’ option within the ‘Commands’ menu associated with this newly created virtual machine.

The first startup process may take a few minutes, depending on the storage option and number of assigned CPU cores.

Create rXg Wi-Fi Controller and tie back with OpenWiFi
Navigate to the ‘Network::Wireless::WLAN Controllers’ scaffold and add a new WLAN Controller entry for the OpenWiFi Controller using the ‘Create New’ button and populate the following fields in the form:
- ‘Name’ with an arbitrary name for the Wi-Fi Controller
- ‘Type’ with the predefined ‘OpenWiFi’ type
- ‘Host’ with the IP address assigned with the OpenWiFi Controller VM (here: 10.0.49.2)
- ‘New Password’ for the default UI username ([email protected]) - if the new password does not meet the complexity requirements, a helpful dialog will be displayed, listing the minimum requirements for the password sequence
- ‘Certificate Authority’ with the previously created local CA (here: ‘Local CA’)
- ‘Virtual Machine’ with the previously created VM (here: ‘openwifi’)
- Check the ‘enable telemetry’ and ‘Allow updates’ boxes as well.
The remaining parameters are maintained in their default state.


Once created, the new WLAN Controller is in the Offline state, as shown below

After a few seconds, the WLAN Controller state changes to ‘Online’ once the communication with the VM completes and the state is synchronized.

At this time, it is possible to log directly into the OpenWiFi Controller UI using the openwifi.wlan.local FQDN when using the rXg as the local DNS server. The static DNS entry is entered automatically into the rXg-local DNS server, visible in the ‘Services::DNS::DNS Records’ scaffold, as shown below:

No user intervention is needed in this case. The OpenWiFi UI relies on the rXg-local CA, hence the self-signed certificate warning in the browser window.

Import OpenWiFi WAPs
Once the rXg Wi-Fi Controller is fully integrated with the OpenWiFi Controller, it is time to bring some OpenWiFi WAPs online and configure them through the rXg Wi-Fi Controller integrations. No actions will be performed using the native OpenWiFi UI, and all communication between WAPs, OpenWiFi Controller, and rXg Wi-Fi Controller rely on the set of well-defined API calls happening behind the scenes.
In order to import a new OpenWiFi WAP, make sure it is powered on, in a factory default state, and able to acquire a DHCP address from one of the rXg DHCP pools. In the following example, the OpenWiFi WAPs are connected to rXg on VLAN 47 and acquire IP addresses in the 10.0.47.0/24 subnet. This will further demonstrate the ability to deploy and control WAPs on different L3 segments, as long as the WAP Controller remains L3-reachable. The relevant pieces of configuration in the ‘Network::LAN’ scaffold are shown below:

Once the OpenWiFi WAP is connected to an Ethernet interface associated with VLAN 47, the WAP acquires an IP address (see the ‘Instruments::MAC|DHCP|DNS::DHCP Leases’ scaffold), as shown below

The WAP is on a correct VLAN and has a MAC address that matches the backplate of the test device. The allocated IP address is 10.0.47.2 and will be used next to discover and associate the WAP with the WAP Controller using the ‘Network::Wireless::WLAN Controllers’ scaffold, and specifically the ‘Import’ button associated with the OpenWiFi Controller. Once the ‘Import’ button is clicked, a new screen appears, as shown below:

Insert the WAP IP address into the ‘Access Point Scan’ field, using /32 host prefix length to reduce the duration of the WAP discovery process. Click ‘Import’ once the host prefixes for all target WAP instances (multiple can be imported simultaneously) are entered. The WAN LED on the WAP should start blinking rapidly, indicating an active discovery process.
Once the discovery process is complete, the ‘Results’ field contains the following output (example):
import success

-- starting AP scan --
scan completed, nmap calls used:
  nmap -p 22 --unprivileged --open 10.0.47.3/32 -oG -

-- AP Scan Results --
The following access point IPs were detected and will be added to the rXg:

10.0.47.3
indicating that the target WAP was indeed detected, discovered, and will be next added to the controller. Click the ‘Close’ button at the bottom of the dialog window. The ‘Network::Wireless::Access Points’ scaffold now lists the new WAP in an offline state, which first needs to be accepted using the ‘Approve’ button associated with the WAP. A confirmation dialog appears and the ‘OK’ button needs be pressed.

The WAP reboots at this time and once it comes back online, its status changes to ‘Online’ (green check mark), as shown below. Additional information, including the AP Profile, Zone, Model, Version, etc. are also displayed. Number of connected Clients, 2.4GHz, 5GHz, and 6GHz channel numbers are also updated, together with the State information (here: ‘Connected’).

Additional OpenWiFi-specific menu option is also added to the WAP scaffold, offering several options, including ‘Get Healthchecks’, ‘Rebind if Necessary’, ‘Get Config’, etc., as shown below.

The OpenWiFi UI also displays summary information about the newly added WAP, as shown below. This is not the primary UI for any WAP-specific operations, though, and should be used for status checks only.

It is also time to enable the configuration synchronization function, which was disabled by default when the WAP Controller was created. In the ‘Network::Wireless::WLAN Controllers’ scaffold, click on the ‘Sync not enabled’ red button to display the following dialog

Click on the ‘Generate Diff’ button (a warning text of ‘No access points online, unable to generate diff’ is likely to appear the first time) and then the ‘Enable Config Synchronization’ button and confirm that the configuration is indeed intended to be applied manually.

The ‘Results’ field may display the following information ‘Configuration is now in sync. Running config saved to startup.’. Click the ‘Close’ button at the bottom of the dialog window. At this time, any changes to the WAP configuration performed in the rXg platform are automatically synchronized back into the OpenWiFi controller, as expected.
WAP Configuration Details
The WAP configuration includes several elements, including (a) zone definition, (b) WAP profile, (c) WLAN definitions, and others.
A WAP zone typically represents the geographical and/or logical area where the given group of WAPs gets deployed. In a large office building, a zone could represent individual building floors, specific organizational units, etc., providing a way to manage all WAPs in a collective manner, e.g., change the SSID settings on all WAPs in the given zone simultaneously. To create a new zone in rXg, use the ‘Network::Wireless::Access Point Zones’ scaffold and the ‘Create New’ button, and then fill what follows:
- ‘Name’ containing an arbitrary zone name,
- ‘Controller’ - make sure that OpenWiFi controller name is selected
- ‘Access Points’ and ‘Zone ID’ should be left unassigned at this time. Individual WAPs can be either imported into the new zone or moved over when the configuration is completed.
- ‘Enable DFS channels’ option can be marked if DFS channels are to be used
- ‘5 GHz channel width’ and ‘6 GHz channel width’ options can be set independently to specific values. For example, for high density deployments, 40 MHz channel width is recommended for 5 GHz band, and 80 MHz channel is recommended for 6 GHz band, given the available number of channels, especially with DFS channels enabled.
- ‘Country code’ should be set to whatever the local country code is - this option optimizes channel availability as well as power levels.
- ‘Enable RRM’ is recommended to be left enabled, providing a dynamic resource management system for WAPs.

Once a new zone is created, it is displayed under the ‘Network::Wireless::Access Point Zones’ scaffold as shown below, together with the ‘Default Zone’ entry.

A similar process can be applied to the ‘Access Point Profiles’ scaffold, creating a new profile to be used for WAPs belonging to a specific zone. To create a new access point profile, use the ‘Network::Wireless::Access Point Profiles’ scaffold and the ‘Create New’ button, and then fill what follows:
- ‘Name’ containing an arbitrary profile name,
- ‘Zone’ select one of the previously defined zones (or no zone at all, since it is possible to create a profile with no current zone association)
- ‘LED State’ controls LED status for all WAPs belonging to the given zone (on or off, depending on the customer preference)
- ‘Controller’- make sure that OpenWiFi controller name is selected to bind the profile to the selected WAP controller instance
- ‘Default’ - check this box to make the given profile default for the controller
- ‘Access Points’ can be used to explicitly assign specific WAPs to this profile (best leave it blank when creating a new profile)
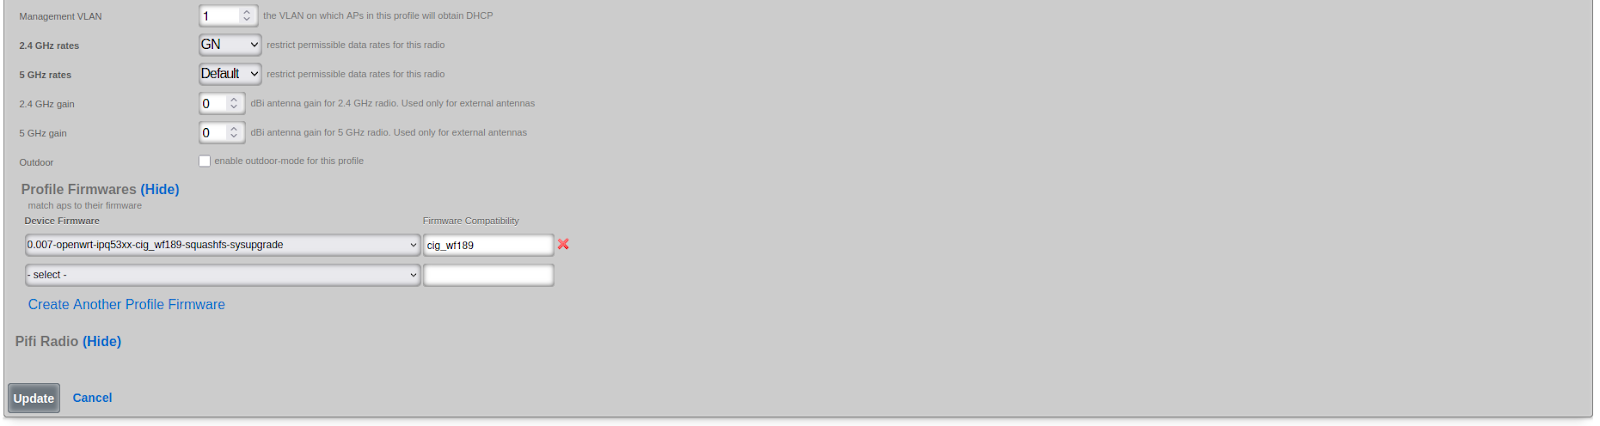
- ‘Management VLAN’ indicates the VLAN on which APs in this profile will obtain DHCP. In typical deployments, the default VLAN (1) is used, unless a specific WAP management VLAN is present.
- ‘2.4 GHz rates’ and ‘5 GHz rates’ selector field permit to restrict supported data rates for this radio - use this options with caution and it is recommended to leave the default values in place for most deployments.
- ‘Outdoor’ - check this box to enable outdoor-mode for this profile

Once created, the new profile is displayed along the default profile present in the rXg by default:

The last step in the process involves the creation of at least one WLAN using use the ‘Network::Wireless::WLANs’ scaffold and the ‘Create New’ button, and then fill what follows:
- ‘Name’ containing an arbitrary WLAN name - note that this is NOT the name of the SSID itself,
- ‘Access point zone’ - select the custom zone created before (‘Home’ in this case)
- ‘Controller’- make sure that OpenWiFi controller name is selected to bind the WLAN to the selected WAP controller instance
- ‘AP Profiles’ - select at least one of the previously created profiles; in this case ‘Home Profile’ associated with ‘Home’ zone
- ‘SSID’ containing the name of the actual service set for the given WLAN instance
- ‘Encryption’ - select one of the available options for the SSID encryption. In the new deployments, WPA3 is highly recommended, but if backward compatibility with legacy devices not supporting WPA3 is required, the mixed WPA2/WPA3 encryption option is available.
- ‘Authentication’ - select one of the available options for the SSID authentication, including the most common ‘none’
- ‘Pre-shared key’ - fill in this field with the pre-shared key value used for non-802.1X based authentication.
- ‘Default VLAN’ indicates the VLAN on which any clients associated with this WLAN will be placed. In typical deployments, the default VLAN (1) is used, unless an SSID-specific VLAN is present.
- ‘Tunnel’, when checked, indicates that the WLAN traffic is tunneled back to the WLAN controller. This setting is typically used with Ruckus WAPs.
- ‘Enabled’ contains several checkboxes to enable specific frequency bands, including 2.4GHz, 5GHz (both lower and upper bands, or selectively the lower or upper band), and 6GHz. The selected frequency bands are only enabled on the given WAP if it is supported by hardware.
- ‘Multicast to unicast conversion’ enables (as the name suggests) conversion of multicast traffic to individual unicast data streams, addressing multicast compatibility problems with some of WAP hardware implementations.
- ‘Hidden SSID’ - when checked, disables beacon frames for the given WAP, which was commonly considered to be part of a security suite for wireless networks. Given the wide availability of software agents capable of recovering the SSID name from other control frames, this option is best left unchecked in any new deployments.
The remaining fields may be left in their default state.

Once created, two new WLANs are shown in the ‘Network::Wireless::WLANs’ scaffold, as shown below. In this case, separate 2.4GHz and 5GHz SSIDs were created, with the 2.4GHz WLAN featuring WPA2 only encryption for backward compatibility with IoT devices, while the 5GHz WLAN features the WPA3 encryption setting for more future-proof devices.

Once the custom zone, profile, and WLAN instances are created, any of the existing imported WAPs can be moved from the default to the custom zone, effectively pushing the zone-specific WLAN and WAP profile configuration to the target device(s). The process may require a reboot of the WAP, hence it is recommended to complete the zone, profile, and WLAN configuration before binding them together and moving target WAPs to the newly created zone, to minimize the service disruption.
In order to move the given WAP from the default to a custom zone, ‘Edit’ the target Access Point Profile in the ‘Network::Wireless::Access Point Profiles’ scaffold, select at least one WAP in the ‘Access Points’ selector field, and accept the changes.

The target WAP moved from the ‘Default AP profile’ / ‘Default Zone’ to the ‘Home Profile’ / ‘Home’, as shown below.

Shortly thereafter, the WAP configuration is updated and the newly created SSIDs start being broadcast. It is also possible to connect to the SSID in question and confirm its target settings, including the PSK, encryption setting, as well as the IP addressing. The example below shows the settings for the ‘Home-5G’ SSID created previously, using WPA3-Personal encryption as well as showing the radio type, IP addressing allocated to the device, etc.


Multiple zones can be simultaneously maintained on the same OpenWiFi Controller, including different SSID configuration per zone, providing therefore a one stop shop for even very complex Wi-Fi deployments in dense networking environments.
The current radio settings on the WAP can be examined in the ‘Network::Wireless::Access Point Radios’ scaffold, as shown below, including an option to display KPIs for the specific radio


The rXg provides access to the original OpenWiFi releases firmware images (e.g., 20250401-cig_wf188n-v4.0.0-rc1-1b10507-upgrade.bin) as well as custom firmware images built by RG Nets to include upstream patches and functional extensions needed to improve the workflow. All of them are stored in the ‘Network::Wireless::Device Firmware’ scaffold, as shown below.
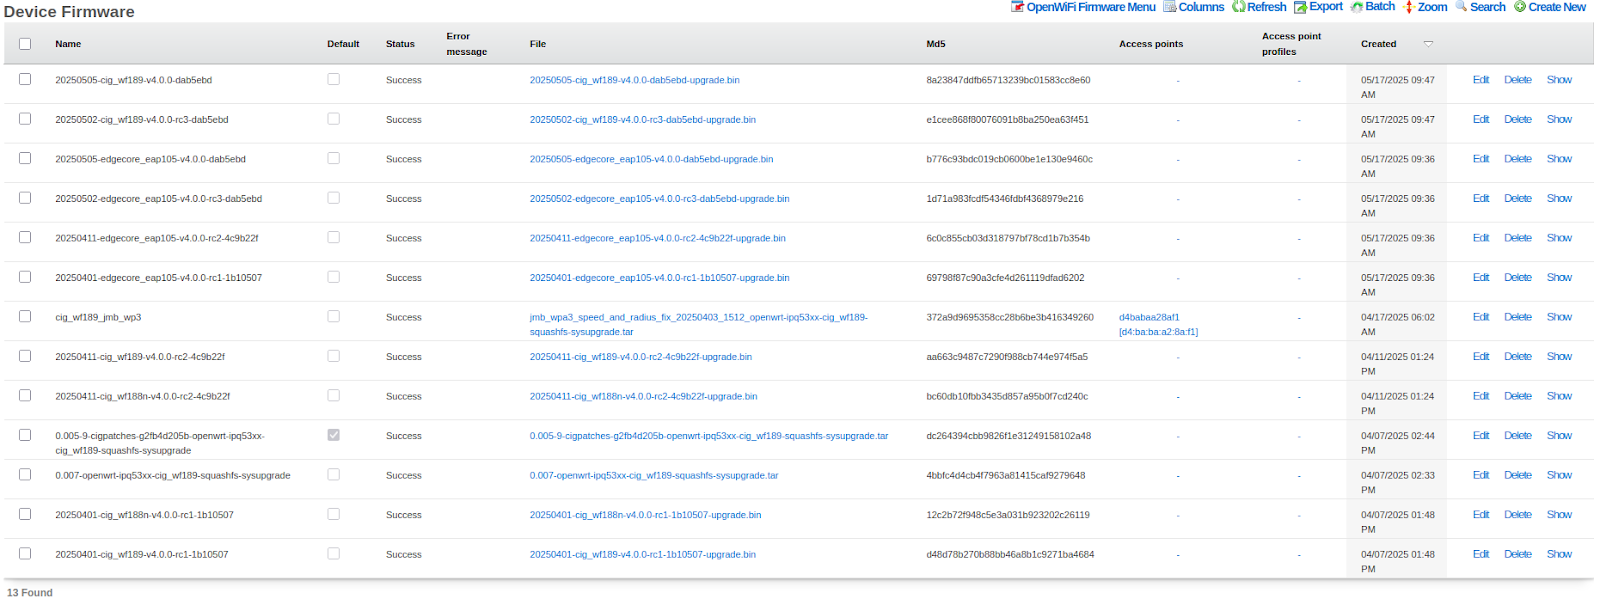
Individual device firmware entries can be created manually, using the ‘Create New’ button, uploaded, and associated with the specific device model, or more conveniently managed using the ‘OpenWiFi Firmware Menu’, which provides access to model-specific firmware options, as shown below.
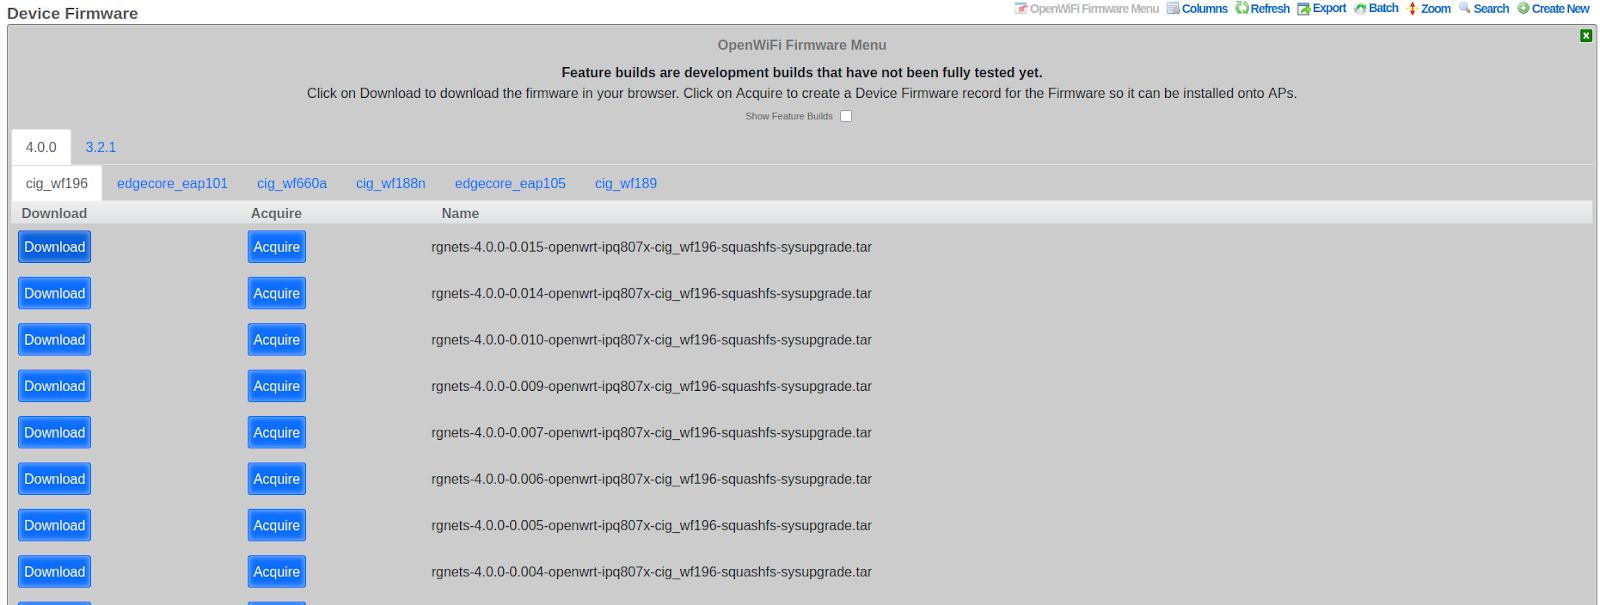
In the ‘OpenWiFi Firmware Menu’, individual tabs provide access to TIP 3.2.1 and 4.0.0 release trains (and likely new ones, in the future, as they become available) and then specific supported WAP models, including CIG 196/660A/188N/189 and EdgeCore 101/105. As new models are tested and confirmed to be operating correctly, new entries will be added to the menu.
The ‘Show feature builds’ checkbox should be used with caution - when checked, it enables access to specific alpha builds (marked in red in the image below), which are not intended for production deployment outside of field / lab testing. These alpha builds are typically developed to address specific feature requests and/or patches and should be treated as unstable.

For each device model, several firmware versions are available, depending on the current build state on RG Nets servers. For example, CIG 189 WAP has a number of TIP 4.0.0 firmware derived versions, ranging from ‘rgnets-4.0.0-0.003-openwrt-ipq53xx-cig_wf189-squashfs-sysupgrade.tar’ through ‘ rgnets-4.0.0-0.015-openwrt-ipq53xx-cig_wf189-squashfs-sysupgrade.tar’. Conveniently, the higher the build number, the newer the firmware and the higher the feature count. No release notes are available for individual firmware versions.
Each firmware release can be either downloaded onto the local machine using the ‘Download’ button or acquired using the ‘Acquire’ button, i.e., stored directly onto the given rXg instance. The latter option is obviously more convenient, since it adds the given firmware file directly onto the rXg and creates the necessary associations.
Once the target firmware file(s) have been downloaded and added to the target rXg system, it is possible to associate the select firmware version with specific WAP instances using the ‘Network::Wireless::Device Firmware’ scaffold (Method A) or ‘Network::Wireless::Access Point Profile’ scaffold (Method B).
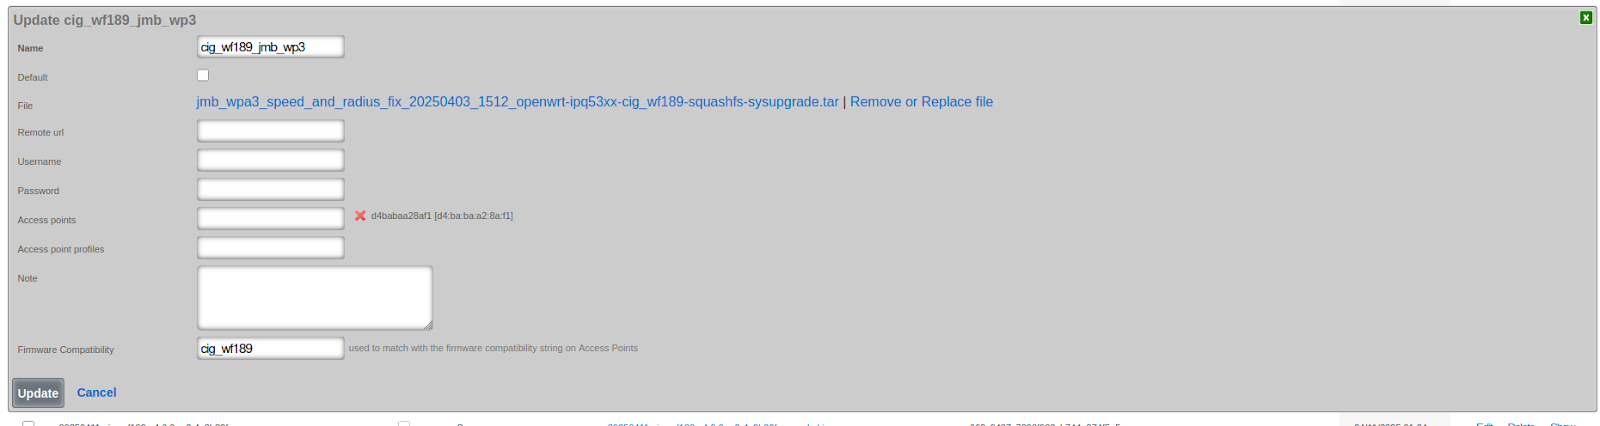
Method A is more labor intensive in the case of many WAPs in the system, but it allows to selectively pick which of the WAPs associated with the system are upgraded, providing much better support for target firmware testing where only select WAPs are upgraded without affecting the overall WAP population. To use the Method A approach, locate the target firmware version (.e.g, ‘jmb_wpa3_speed_and_radius_fix_20250403_1512_openwrt-ipq53xx-cig_wf189-squashfs-sysupgrade.tar’ providing improved WAP3 performance) in the ‘Network::Wireless::Device Firmware’ scaffold, select ‘Edit’ and select names / MAC addresses of target WAPs in the ‘Access points’ selector field, as shown below. In this case, a WAP ‘d4babaa28af1 [d4:ba:ba:a2:8a:f1]’ was selected. Once the selection process has been completed, click the ‘Update’ button to save changes.
Method B is designed to roll out the specific firmware version to all WAPs with the specific hardware model. In the ‘Network::Wireless::Access Point Profile’ scaffold, select the specific target WAP profile and click the ‘Edit’ button. Under the ‘Profile Firmwares’ section, select the target firmware file (e.g., ‘0.007-openwrt-ipq53xx-cig_wf189-squashfs-sysupgrade’) and associate it with the specific OpenWiFi device model (e.g., cig_wf189), as shown below. Multiple device models can be configured simultaneously. Once the selection process has been completed, click the ‘Update’ button to save changes. The model designations for the ‘Firmware Compatibility’ field can be obtained from the ‘OpenWiFi Firmware Menu’ hardware selector